
3Drill™
Description as a Tweet:
Why spend $20 on a drill when you can spend 20 hours creating a 3D printed one? Live your broke college student dreams while using the loudest drill you've ever heard in your entire life! (We really mean the loudest drill) #CollegeHacks #BrokeCollegeKids #TeamForTheMeme
Inspiration:
I had a multi-purpose screwdriver with a flashlight on my desk. My roommate picked it and asked how to activate the motor. The disappointed look on his face after realizing that it was in fact not motorized inspired the group to develop a drill that was affordable for college students while being fun to use.
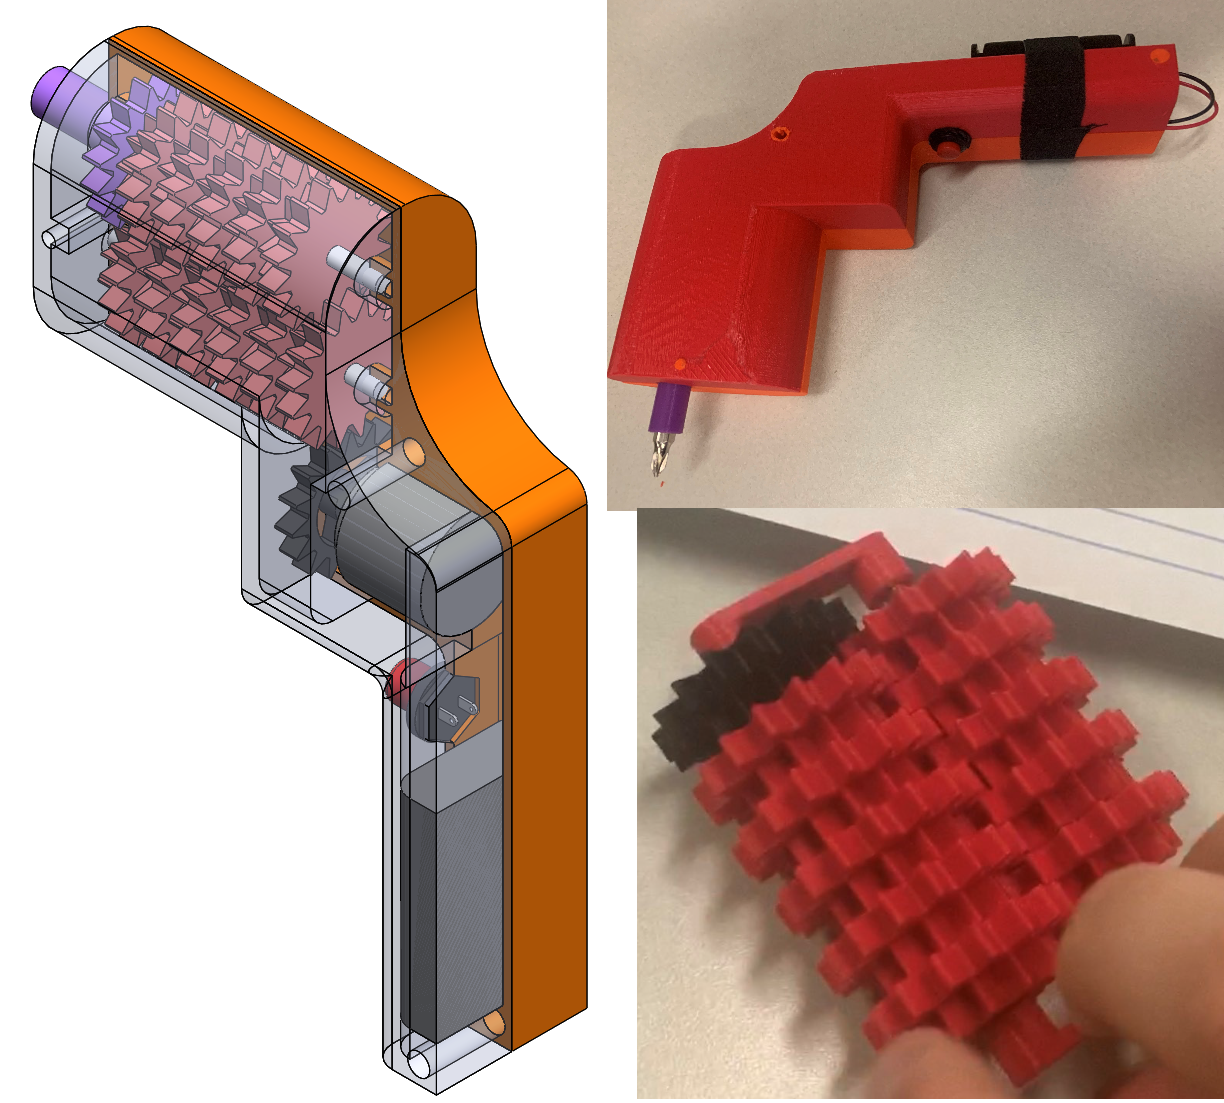
What it does:
The drill uses a 13 gear train to convert the high speed of a DC motor to torque. It features a push button to use the drill only as needed, with an accessible compartment for two AA batteries to power the system. Everything except the motor, two axles, the battery pack, and the button was designed and 3D printed by us.
How we built it:
We started with an idea, similar to the end product described above. From here, we experimented with different gear and teeth sizes on SolidWorks until we found a working design. Once we found a design we believed would work, we took it to the 3D printers and had them printed. As these were printed, we acquired a DC motor and planned how to connect the motor to the gears. We decided on creating a gear that would fit snugly around the motor shaft and connected it to the printed gear train. Finally, we added a special gear that would house the bit. As these parts were printed, we proceeded to design a functional chassis that would house the gear train, the motor, the power button, and the battery case. We then sent this in for printing and soldered all the electrical components. After everything had been printed, we assembled the device and made any necessary final adjustments.
Technologies we used:
- Other Hardware
Challenges we ran into:
We had some tolerance issues with some non-3D printed parts that didn't fit as snugly into the design as we had hoped. Since we didn't had the time to make necessary design modification and reprint, we had to adjust with the parts we had available.
Accomplishments we're proud of:
We are most proud of our gear train, since the design was tested and works seamlessly with the motor, producing a high torque as we had intended.
What we've learned:
It improved the team's CAD modeling skills (specifically in SolidWorks), as well as knowledge in the compatibility of electronics.
What's next:
We plan to create a revised case for the drill with improved tolerances and a better shape. We also are looking to increase motor efficiency in the future.
Built with:
We used SolidWorks, 3D printing, solder, axles, power button, motor, and manpower.
Prizes we're going for:
- Best Hardware Hack
- Best STEM Hack
- Funniest Hack
Team Members
Jeffrey Matheson